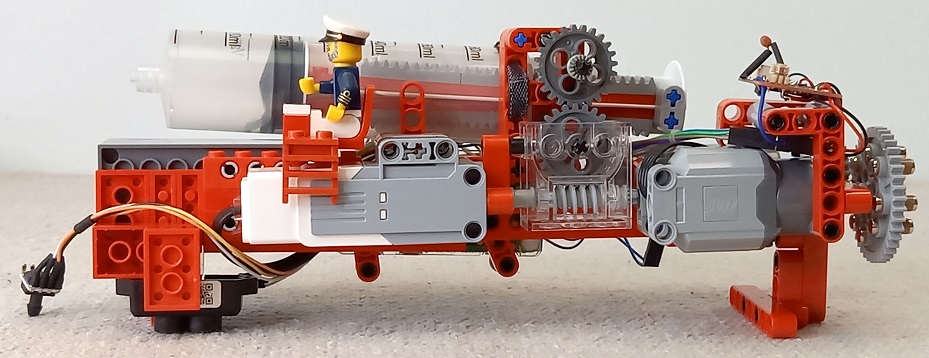
Here is the finished radio-controlled submarine.

Does it work? Yeah, it drives well under water. The automatic depth control really makes controlling it easy, as you can focus on pressing only forward/backward and left/right buttons and forget the dive/surface buttons. I’d say the controls are as good as in Submarine 2.0, which has been the best so far.
Pros? PID control works quite accurately. Seals were always watertight and the hull never leaked. Submarine top speed is the best so far. The main propeller is powerful. Magnetic couplings work more efficiently than before, because of silicone lubricant. More free space inside the hull because of tungsten pellets.
Cons? End caps are time consuming to close, because of the tight seals and the need to equalize internal pressure. Radio control range is short, only 4 meters. Turn propeller is a bit too weak. The submarine won’t drive straight when going top speed, probably because of the flat front. Tungsten pellets are expensive. Laser distance sensor is almost useless, because its range in clear water is only 0.5 meters. Tacho pulses are sometimes lost and you need to fix syringe position parameter. Complex to build.
Do I recommend building this? Not really. It is too complex and time consuming to build. It took me about 300 hours, although a lot was spent in development, mistakes and videography. Unless you want to try PID control specifically, I’d recommend Submarine 2.0 which is simpler and has good controls.
How to improve it? Make the end caps easier to install and add a locking mechanism. Change the radio control board to something more powerful. Remove laser distance sensor. Increase turn propeller size or gear ratio. Make the front more streamlined. Make the syringe position data reliable somehow.

Key features
- Displacement: 2.4 kg
- Test depth: 1.5 m
- Radio control range: 4 m
- Power consumption: 1.4 W idle, 5.6 W max
- Battery runtime: 2 hours
- Top speed: 0.6 knots (0.3 m/s, 1.1 km/h)
Parts
- Hull: acrylic plastic cylinder (250x110x3mm)
- End caps: SAN plastic lid (2mm thick), acrylic plastic cylinder (100x3mm)
- Seal: o-ring 2.5 mm (NBR 70 shore)
- Extra weight: tungsten pellets (2.5 mm diameter, 1.58 kg)
- Ballast tank: 60 ml syringe (Eotia marinade injector)
- Ballast motor: Lego EV3 Medium Servo motor (45503)
- Forward propeller: drone propeller (Diatone Bull Nose 4×4.5)
- Forward motor: Lego PF L-motor (88003)
- Turn propeller: Lego propeller 3 blade (6041)
- Turn motor: Lego PF M-motor (8883)
- Magnets: K&J Magnetics D38-N52 neodymium magnet
- Friction reduction: TapeCase 423-5 UHMW Tape, silicon spray
- Motor driver: Pololu 2130 DRV8833 Dual H-bridge
- Radio control: 27 MHz controller dissembled from a toy submarine (no-name chinese Mini U Boat)
- Pressure sensor: Honeywell SSCMANV030PA2A3 2 bar
- Laser distance sensor: SparkFun TFMini-S Micro
- Computer: Raspberry Pi Zero 2 W
- Power supply: Lego Rechargeable Battery Box 9V (8878)
- Voltage regulator: Pololu 2123 S7V8F5 5V
Lego parts
1x 8878 Power Functions Rechargeable Battery Box
1x 99455 Electric, Motor EV3, Medium
1x 45514 Cable Pack EV3
1x 88003 Power Functions L-Motor
1x 8883 Power Functions M-Motor
2x 8886 Power Functions Extension Wire (20cm)
1x 6041 Propeller 3 Blade 3 Diameter with Axle Hole
1x col154 Sea Captain, Series 10 (Minifigure Only without Stand and Accessories)
1x 4079b Minifigure, Utensil Seat / Chair 2 x 2 with Center Sprue Mark
1x 3069bp68 Tile 1 x 2 with Groove with Red and Yellow Controls and Two White Stripes on Left Pattern
1x 4175 Ladder 1 1/2 x 2 x 2
2x 3649 Technic, Gear 40 Tooth
4x 3648 Technic, Gear 24 Tooth (2nd Version - 1 Axle Hole)
2x 6589 Technic, Gear 12 Tooth Bevel
4x 10928 Technic, Gear 8 Tooth with Dual Face
1x 4716 Technic, Gear Worm Screw, Long
6x 3743 Technic, Gear Rack 1 x 4
1x 6588 Technic, Gearbox 2 x 4 x 3 1/3
1x 48496 Technic, Pin Connector Toggle Joint Smooth Double with 2 Pins
2x 32530 Technic, Pin Connector Plate 1 x 2 x 1 2/3 with 2 Holes (Double on Top)
2x 62462 Technic, Pin Connector Round 2L with Slot (Pin Joiner Round)
2x 6558 Technic, Pin 3L with Friction Ridges
28x 4459 Technic, Pin with Friction Ridges without Center Slots
1x 32002 Technic, Pin 3/4
6x 4274 Technic, Pin 1/2 without Friction Ridges
6x 3713 Technic Bush
3x 4265c Technic Bush 1/2 Smooth
22x 4265a Technic Bush 1/2 Toothed, Four Interior Ridges
1x 3737 Technic, Axle 10L
2x 44294 Technic, Axle 7L
2x 3706 Technic, Axle 6L
5x 3705 Technic, Axle 4L
2x 18651 Technic, Axle 2L with Pin with Friction Ridges
4x 43093 Technic, Axle 1L with Pin with Friction Ridges
1x 3703 Technic, Brick 1 x 16 with Holes
1x 2730 Technic, Brick 1 x 10 with Holes
1x 3894 Technic, Brick 1 x 6 with Holes
1x 3701 Technic, Brick 1 x 4 with Holes
1x 32525 Technic, Liftarm Thick 1 x 11
1x 32524 Technic, Liftarm Thick 1 x 7
1x 32316 Technic, Liftarm Thick 1 x 5
4x 32523 Technic, Liftarm Thick 1 x 3
1x 43857 Technic, Liftarm Thick 1 x 2
2x 18654 Technic, Liftarm Thick 1 x 1 (Spacer)
4x 32526 Technic, Liftarm, Modified Bent Thick L-Shape 3 x 5
1x 32140 Technic, Liftarm, Modified Bent Thick L-Shape 2 x 4
4x 60484 Technic, Liftarm, Modified T-Shape Thick 3 x 3
3x 32056 Technic, Liftarm, Modified Bent Thin L-Shape 3 x 3
2x 41677 Technic, Liftarm Thin 1 x 2 - Axle Holes
2x 4032 Plate, Round 2 x 2 with Axle Hole
3x 3020 Plate 2 x 4
1x 3021 Plate 2 x 3
2x 60479 Plate 1 x 12
1x 4477 Plate 1 x 10
3x 3666 Plate 1 x 6
1x 3710 Plate 1 x 4
2x 3023 Plate 1 x 2
1x 3069 Tile 1 x 2
1x 3003 Brick 2 x 2
1x 3001 Brick 2 x 4
1x 3004 Brick 1 x 2
Cost
- 236 EUR tungsten pellets
- 100 EUR Lego rechargeable battery box
- 55 EUR laser distance sensor TFMini-S Micro
- 36 EUR acrylic plastic hull
- 35 EUR pressure sensor SSCMANV030PA2A3
- 33 EUR radio control (mini u-boat)
- 28 EUR Raspberry Pi Zero 2 W
- 25 EUR Lego Medium motor EV3
- 24 EUR magnets
- 22 EUR crimp tool
- 21 EUR Lego M-Motor
- 20 EUR pin header connector kit
- 20 EUR voltage regulator
- 18 EUR o-ring cord
- 18 EUR Lego L-Motor
- 10 EUR motor drivers
- 6 EUR Lego captain
- 5 EUR clear case for Raspberry Pi Zero
- 5 EUR SAN plastic lid
- 4 EUR syringe
- 3 EUR wire
- 1 EUR main propeller
- 50 EUR other Lego parts
- TOTAL COST: 800 EUR
Interior images


Testing images


Video
Here is a YouTube video of this project. From 2:30 onward you find test footage from the water container, swimming pool, and river.
And here is the entire 20 minute dive in the river.
Code
Python implementation and logs for download:
https://mega.nz/folder/wqhhxJoI#cHnVI6NjaPkfZcdZvFZZ0Q
or
https://www.dropbox.com/sh/u8a45maz3brrwrw/AADbUx9VZEw5UJPny1bJI-Lwa
Python implementation for the submarine:
#################################################
# Submarine 4.0
# Created by: Brick Experiment Channel
# Hardware:
#    Raspberry Pi Zero 2 W
#    Honeywell SSCMANV030PA2A3 pressure sensor
#    SparkFun TFMini-S Micro laser distance sensor
#    Pololu 2130 DRV8833 motor drivers
#    Pololu 2123 S7V8F5 5V Voltage regulator
#    27MHz radio controller from a toy submarine
#    Lego EV3 Medium motor for syringe ballast tank
#    Lego PF Large motor for forward propeller
#    Lego PF Medium motor for turn propeller
#
#################################################

#settings
SYRINGE_POS_MIN     = 3     #syringe ballast min pos [ml]
SYRINGE_POS_MAX     = 45    #syringe ballast max pos [ml]
SYRINGE_TACHO_COUNT = 19000 #tacho count from syringe min to max pos
SYRINGE_HYSTERESIS  = 360   #syringe+gearbox backlash/hysteresis [tacho counts]
SYRINGE_DEADBAND    = 0.5   #deadband to reduce motor wear [ml]
SYRINGE_NEUTRAL_POS = 30    #neutral buoyancy position [ml]
DEPTH_FILTER        = 0.90  #pressure sensor depth EMA filter ratio [0...1]
DISTANCE_FILTER     = 0.95  #laser distance EMA filter ratio [0...1]
KD_FILTER           = 0.95  #derivative EMA filter ratio [0...1]
MAX_DEPTH           = 4     #maximum limit for depth control [m]
MAX_DISTANCE        = 1     #maximum limit for laser distance [m]
KP                  = 30    #PID proportional factor
KI                  = 1     #PID integral factor
KD                  = 200   #PID derivative factor
SLEEP_TIME          = 20    #main loop sleep [ms]

#################################################

from time import sleep, perf_counter_ns
from datetime import datetime
import math
import signal
import smbus
import configparser
from serial import Serial
from gpiozero import DigitalInputDevice, DigitalOutputDevice, PWMOutputDevice, Button
from gpiozero import LoadAverage, CPUTemperature

#syringe control mode
MODE_DIRECT      = 0  #no PID (radio buttons control syringe directly)
MODE_PID         = 1  #PID over pressure sensor (buttons change target depth)
MODE_PID_LASER   = 2  #PID over laser sensor (buttons change target distance to sea floor)

controlMode = MODE_DIRECT
targetDepth = 0.10     #[m]
targetDistance = 0.10  #[m]

#read config file
configFile = open("submarine_4.ini", "r+")
config = configparser.ConfigParser()
config.read_file(configFile)
tachoCount = int(config['default']['tachoCount'])

storedTachoCount = tachoCount
def writeConfigFile():
    global configFile
    global config
    global tachoCount
    global storedTachoCount
    if tachoCount != storedTachoCount:
        storedTachoCount = tachoCount
        config['default'] = {}
        config['default']['tachoCount'] = str(tachoCount)
        configFile.seek(0)
        config.write(configFile)
        configFile.truncate()

#prepare pressure sensor
bus = smbus.SMBus(1)

def readPressureSensor():
    #read data
    PRESSURE_SENSOR_ADDR = 0x28
    data = bus.read_i2c_block_data(PRESSURE_SENSOR_ADDR, 0x00, 4)
    status = (data[0] & 0xC0) >> 6
    pressCounts = data[1] | ((data[0] & 0x3F) << 8)
    tempCounts = ((data[3] & 0xE0) >> 5) | (data[2] << 3)

    #pressure conversion
    P_MAX = 2  #[bar]
    P_MIN = 0  #[bar]
    O_MAX = 0.9 * pow(2,14)
    O_MIN = 0.1 * pow(2,14)
    pressure = (pressCounts - O_MIN) * (P_MAX - P_MIN) / (O_MAX - O_MIN) + P_MIN  #[bar]

    #temperature conversion
    T_MAX = 150  #[Celsius]
    T_MIN = -50  #[Celsius]
    T_COUNTS = pow(2,11) - 1
    temperature = tempCounts * (T_MAX - T_MIN) / T_COUNTS + T_MIN  #[Celsius]

    return pressure, temperature

#prepare laser distance sensor
serial = Serial("/dev/serial0", 115200, timeout=0.01)
serial.write([0x5A,0x05,0x05,0x06,0x6A])  #set unit to mm
serial.write([0x5A,0x06,0x03,0x64,0x00,0x39])  #set frame rate to 100 Hz
serial.write([0x5A,0x09,0x3B,0x00,0x00,0x00,0x00,0x00,0x62])  #set I/O mode to standard
sleep(0.1)
serial.reset_input_buffer()

def readLaserSensor():
    #skip old serial data
    FRAME_SIZE = 9
    while (serial.inWaiting() > FRAME_SIZE):
        serial.read()

    #read data
    data = serial.read(FRAME_SIZE)

    #parse data
    distance = float('nan')
    strength = float('nan')
    temperature = float('nan')
    if len(data) == FRAME_SIZE and data[0] == 0x59 and data[1] == 0x59:
        checksum = 0
        for i in range(0, FRAME_SIZE - 1):
            checksum = checksum + data[i]
        checksum = checksum & 0xFF
        if checksum == data[FRAME_SIZE - 1]:
            distance = data[2] | data[3] << 8  #[mm]
            strength = data[4] | data[5] << 8  #[0-65536]
            temperature = data[6] | data[7] << 8

            distance = distance / 1000   #[m]
            temperature = temperature / 8 - 256  #[C]

    #scale for water
    SPEED_IN_AIR = 299000  #[km/s]
    SPEED_IN_WATER = 225000  #[km/s]
    distance *= SPEED_IN_WATER / SPEED_IN_AIR

    return distance, strength, temperature

#prepare motor drivers
motorForward = PWMOutputDevice(22)
motorForward.frequency = 1000
motorBackward = PWMOutputDevice(27)
motorBackward.frequency = 1000
motorLeft = DigitalOutputDevice(17)
motorRight = DigitalOutputDevice(18)
motorDive = DigitalOutputDevice(13)
motorSurface = DigitalOutputDevice(12)

#prepare radio control
radioPower = DigitalOutputDevice(25)
buttonForward = Button(24, hold_time=1.0)
buttonBackward = Button(23, hold_time=1.0)
buttonLeft = Button(9)
buttonRight = Button(10)
buttonDive = Button(11, bounce_time=None, hold_time=1.0, hold_repeat=True)
buttonSurface = Button(8, bounce_time=None, hold_time=1.0, hold_repeat=True)

def changeTargetDepth(value):
    global controlMode
    global targetDepth
    global targetDistance
    if controlMode == MODE_PID:
        targetDepth += value
        if targetDepth < 0:
            targetDepth = 0
        if targetDepth > MAX_DEPTH:
            targetDepth = MAX_DEPTH
        print("targetDepth=%.0f cm" % (targetDepth*100))
    elif controlMode == MODE_PID_LASER:
        targetDistance -= value
        if targetDistance < 0.1:
            targetDistance = 0.1
        if targetDistance > MAX_DISTANCE:
            targetDistance = MAX_DISTANCE
        print("targetDistance=%.0f cm" % (targetDistance*100))
def buttonDive_pressed():
    changeTargetDepth(0.1)
def buttonDive_held():
    changeTargetDepth(0.5)
def buttonSurface_pressed():
    changeTargetDepth(-0.1)
def buttonSurface_held():
    changeTargetDepth(-0.5)
def buttonForward_pressed():
    motorForward.value = 0.6
def buttonForward_held():
    motorForward.value = 1
def buttonForward_released():
    motorForward.value = 0
def buttonBackward_pressed():
    motorBackward.value = 0.6
def buttonBackward_held():
    motorBackward.value = 1
def buttonBackward_released():
    motorBackward.value = 0
def buttonLeft_pressed():
    motorLeft.value = 1
def buttonLeft_released():
    motorLeft.value = 0
def buttonRight_pressed():
    motorRight.value = 1
def buttonRight_released():
    motorRight.value = 0

buttonForward.when_pressed   = buttonForward_pressed
buttonForward.when_held      = buttonForward_held
buttonForward.when_released  = buttonForward_released
buttonBackward.when_pressed  = buttonBackward_pressed
buttonBackward.when_held     = buttonBackward_held
buttonBackward.when_released = buttonBackward_released
buttonLeft.when_pressed      = buttonLeft_pressed
buttonLeft.when_released     = buttonLeft_released
buttonRight.when_pressed     = buttonRight_pressed
buttonRight.when_released    = buttonRight_released
buttonDive.when_pressed      = buttonDive_pressed
buttonDive.when_held         = buttonDive_held
buttonSurface.when_pressed   = buttonSurface_pressed
buttonSurface.when_held      = buttonSurface_held

#prepare tachometers
tachoPower = DigitalOutputDevice(20)
tachoA = DigitalInputDevice(16)
tachoB = DigitalInputDevice(19)

tachoAValue = tachoA.value
tachoBValue = tachoB.value
def tachoA_rising():
    global tachoCount
    global tachoAValue
    global tachoBValue
    tachoAValue = 1
    if tachoBValue == 0:
        #A in rising edge and B in low value
        #  => direction is clockwise (shaft end perspective)
        tachoCount += 1
    else:
        tachoCount -= 1
def tachoA_falling():
    global tachoAValue
    tachoAValue = 0
def tachoB_rising():
    global tachoCount
    global tachoAValue
    global tachoBValue
    tachoBValue = 1
    if tachoAValue == 0:
        tachoCount -= 1
    else:
        tachoCount += 1
def tachoB_falling():
    global tachoBValue
    tachoBValue = 0

tachoA.when_activated   = tachoA_rising
tachoA.when_deactivated = tachoA_falling
tachoB.when_activated   = tachoB_rising
tachoB.when_deactivated = tachoB_falling

tachoPower.value = 1

#exit program when Ctrl-C is pressed
exitRequested = False
def sigintHandler(sig, frame):
    print("Ctrl-C pressed, exit program")
    global exitRequested
    exitRequested = True
signal.signal(signal.SIGINT, sigintHandler)
signal.signal(signal.SIGTERM, sigintHandler)

def sign(x):
    if x > 0: return 1
    elif x < 0: return -1
    else: return 0

print("program started")
sleep(0.1)

startTime = perf_counter_ns()
prevLoopTime = perf_counter_ns()
prevModeButtonTime = perf_counter_ns()
prevRadioResetTime = perf_counter_ns()
prevTaskTime = perf_counter_ns()
prevLogTime = perf_counter_ns()
prevPrintTime = perf_counter_ns()
trueTachoCount = 0
depthZeroPoint = float('nan')
depthFiltered = 0
laserDistanceValidTime = 0
laserDistanceFiltered = 0
modeButtonStep = 0
error = 0
integral = 0
derivative = 0
PIDoutput = 0
prevError = float('nan')
prevDerivative = 0
syringeTargetPos = 0
deadbandDir = 0
cpuTemp = float('nan')
logFile = None
logData = []
loopCount = 0

while not exitRequested:
    timeDelta = (perf_counter_ns() - prevLoopTime) / 1e9  #[sec]
    prevLoopTime = perf_counter_ns()
    secondsSinceStart = (perf_counter_ns() - startTime) / 1e9

    #calculate syringe position
    if tachoCount > trueTachoCount:
        trueTachoCount = tachoCount
    elif tachoCount < trueTachoCount - SYRINGE_HYSTERESIS:
        trueTachoCount = tachoCount + SYRINGE_HYSTERESIS
    syringePos = SYRINGE_POS_MIN + SYRINGE_POS_MAX * \
                 trueTachoCount / SYRINGE_TACHO_COUNT  #[ml]

    #read pressure sensor
    pressure, pressureSensorTemp = readPressureSensor()

    #calculate depth
    GRAVITY = 9.80665  #[m/s2]
    WATER_DENSITY = 998  #fresh water at 20 Celsius [kg/m3]
    pressurePa = pressure * 100000  #[Pa]
    depth = pressurePa / (GRAVITY * WATER_DENSITY)  #[m]

    #adjust for depth zero point
    if math.isnan(depthZeroPoint): depthZeroPoint = depth
    if syringePos <= 0:
        #when syringe is empty, assume we are in surface and start adjusting
        depthZeroPoint = 0.01 * depth + 0.99 * depthZeroPoint
    depth -= depthZeroPoint

    #filter depth (exponential moving average)
    depthFiltered = (1 - DEPTH_FILTER) * depth + DEPTH_FILTER * depthFiltered

    #read laser sensor
    laserDistance, laserStrength, laserTemp = readLaserSensor()

    #fix laser data for close distance (when sensor says 0.05m it is actually 0.10m)
    laserDistanceFixed = laserDistance
    if laserDistanceFixed < 0.25:
        laserDistanceFixed += 0.5 * (0.25 - laserDistanceFixed) * \
                              math.sqrt(laserDistanceFixed / 0.25)

    #omit unreliable laser data
    if laserStrength < 300 or laserDistance > 10:
        laserDistanceFixed = float('nan')
        if (perf_counter_ns() - laserDistanceValidTime) / 1e9 >= 1.0:
            laserDistanceFiltered = float('nan')
    else:
        if math.isnan(laserDistanceFiltered):
            laserDistanceFiltered = laserDistanceFixed
        laserDistanceValidTime = perf_counter_ns()

    #filter laser distance (exponential moving average)
    if not math.isnan(laserDistanceFixed):
        laserDistanceFiltered = (1 - DISTANCE_FILTER) * laserDistanceFixed + \
                                DISTANCE_FILTER * laserDistanceFiltered

    #calculate syringe neutral position
    #  hull compression compensation (15 ml at 100 cm depth)
    syringeNeutralPos = SYRINGE_NEUTRAL_POS
    if depthFiltered > 1:
        syringeNeutralPos -= 15
    elif depthFiltered > 0:
        syringeNeutralPos -= math.sqrt(depthFiltered) * 15 / 1

    #change depth control mode
    #  triggered by button sequences
    #    MODE_DIRECT    = Surface-Dive-Surface
    #    MODE_PID       = Surface-Dive-Right
    #    MODE_PID_LASER = Surface-Dive-Left
    changeMode = False
    if buttonSurface.value == 1:
        if modeButtonStep == 0:
            prevModeButtonTime = perf_counter_ns()
            modeButtonStep = 1
        if modeButtonStep == 2:
            modeButtonStep = 3
            controlMode = MODE_DIRECT
            print("MODE_DIRECT")
    if buttonDive.value == 1:
        if modeButtonStep == 1:
            modeButtonStep = 2
    if buttonRight.value == 1:
        if modeButtonStep == 2:
            modeButtonStep = 3
            controlMode = MODE_PID
            print("MODE_PID")
    if buttonLeft.value == 1:
        if modeButtonStep == 2:
            modeButtonStep = 3
            controlMode = MODE_PID_LASER
            print("MODE_PID_LASER")
    if modeButtonStep != 0 and (perf_counter_ns() - prevModeButtonTime) / 1e9 >= 1.5:
        modeButtonStep = 0

    #control syringe motor
    syringeMotorCtrl = 0
    if controlMode == MODE_DIRECT:
        if buttonDive.value == 1: syringeMotorCtrl = 100
        elif buttonSurface.value == 1: syringeMotorCtrl = -100

    elif controlMode == MODE_PID:
        if targetDepth <= 0:
            #go to surface
            if syringePos > 0:
                syringeMotorCtrl = -100
            else:
                syringeMotorCtrl = 0
        else:
            #PID controller
            error = targetDepth - depthFiltered
            integral += error * timeDelta
            if math.isnan(prevError) or buttonDive.value == 1 or buttonSurface.value == 1:
                prevError = error
            derivative = (error - prevError) / timeDelta
            derivative = (1 - KD_FILTER) * derivative + KD_FILTER * prevDerivative
            PIDoutput = KP * error + KI * integral + KD * derivative
            prevError = error
            prevDerivative = derivative

            #move syringe to the target position
            syringeTargetPos = syringeNeutralPos + PIDoutput  #[ml]
            syringeMotorCtrl = syringeTargetPos - syringePos

    elif controlMode == MODE_PID_LASER:
        if depthFiltered >= MAX_DEPTH:
            #limit to max depth
            syringeMotorCtrl = -100

        elif math.isnan(laserDistanceFixed):
            #bottom too far for laser -> increase depth
            syringeMotorCtrl = 100

        else:
            #PID controller
            error = laserDistanceFiltered - targetDistance
            integral += error * timeDelta
            if math.isnan(prevError) or buttonDive.value == 1 or buttonSurface.value == 1:
                prevError = error
            derivative = (error - prevError) / timeDelta
            derivative = (1 - KD_FILTER) * derivative + KD_FILTER * prevDerivative
            PIDoutput = KP * error + KI * integral + KD * derivative
            prevError = error
            prevDerivative = derivative

            #move syringe to the target position
            syringeTargetPos = syringeNeutralPos + PIDoutput  #[ml]
            syringeMotorCtrl = syringeTargetPos - syringePos

    #syringe deadband limitation
    if abs(syringeMotorCtrl) > SYRINGE_DEADBAND:
        deadbandDir = sign(syringeMotorCtrl)
    if sign(syringeMotorCtrl) != sign(deadbandDir):
        deadbandDir = 0
    if deadbandDir == 0:
        syringeMotorCtrl = 0

    #syringe range limitation
    if syringePos <= SYRINGE_POS_MIN and syringeMotorCtrl < 0:
        syringeMotorCtrl = 0
    if syringePos >= SYRINGE_POS_MAX and syringeMotorCtrl > 0:
        syringeMotorCtrl = 0

    #drive syringe motor
    motorDive.value = (syringeMotorCtrl > 0)
    motorSurface.value = (syringeMotorCtrl < 0)

    #radio controller fix
    #  the radio board has an auto-surface safety feature
    #  after 10 secs of silence it will force the surface button on
    #  to fix it, we will quickly power off and on the radio every 9 secs
    if (buttonDive.value == 1 or buttonForward.value == 1 or
       buttonBackward.value == 1 or buttonLeft.value == 1 or buttonRight.value == 1):
        prevRadioResetTime = perf_counter_ns()
    secsSinceRadioReset = (perf_counter_ns() - prevRadioResetTime) / 1e9
    if secsSinceRadioReset > 9:
        radioPower.value = 0
        prevRadioResetTime = perf_counter_ns()
    else:
        radioPower.value = 1

    #low frequency tasks
    if (perf_counter_ns() - prevTaskTime) / 1e9 >= 1.0:
        prevTaskTime = perf_counter_ns()

        #get info from raspberry
        cpuTemp = CPUTemperature().temperature

        #write config file
        writeConfigFile()

    #debug data
    motorsState = (motorForward.value > 0) | (motorBackward.value > 0) << 1 | \
                  motorLeft.value << 2 | motorRight.value << 3 | \
                  motorDive.value << 4 | motorSurface.value << 5
    buttonsState = buttonForward.value | buttonBackward.value << 1 | \
                   buttonLeft.value << 2 | buttonRight.value << 3 | \
                   buttonDive.value << 4 | buttonSurface.value << 5

    #log data for post analysis
    logLine = [secondsSinceStart, pressure, depth, depthZeroPoint,
               depthFiltered, targetDepth, laserDistance,
               laserStrength, laserDistanceFiltered, targetDistance,
               tachoCount, trueTachoCount,
               syringePos, syringeTargetPos, syringeNeutralPos,
               error, integral, derivative, PIDoutput, syringeMotorCtrl,
               controlMode, motorsState, buttonsState, radioPower.value,
               pressureSensorTemp, laserTemp, cpuTemp]
    logData.append([])
    for value in logLine:
        strValue = None
        if type(value) == float: strValue = str('%.5g' % value)
        else: strValue = str(value)
        logData[-1].append(strValue)

    #write log data to file
    if (perf_counter_ns() - prevLogTime) / 1e9 >= 1.0:
        prevLogTime = perf_counter_ns()
        if logFile == None:
            filename = "datalog_" + datetime.now().strftime("%Y%m%d_%H%M%S") + ".dat"
            logFile = open(filename, "w")
            logHeader = [["# Submarine 4.0 log"]]
            logHeader += [["# SETTINGS:","SYRINGE_POS_MIN",SYRINGE_POS_MIN,
                           "SYRINGE_POS_MAX",SYRINGE_POS_MAX,
                           "SYRINGE_TACHO_COUNT",SYRINGE_TACHO_COUNT,
                           "SYRINGE_HYSTERESIS",SYRINGE_HYSTERESIS,
                           "SYRINGE_DEADBAND",SYRINGE_DEADBAND,
                           "SYRINGE_NEUTRAL_POS",SYRINGE_NEUTRAL_POS,
                           "DEPTH_FILTER",DEPTH_FILTER,
                           "DISTANCE_FILTER",DISTANCE_FILTER,
                           "KD_FILTER",KD_FILTER,
                           "MAX_DEPTH",MAX_DEPTH,
                           "MAX_DISTANCE",MAX_DISTANCE,
                           "KP",KP,"KI",KI,"KD",KD,
                           "SLEEP_TIME",SLEEP_TIME]]
            logHeader += [["#"]]
            logHeader += [["secondsSinceStart","pressure","depth","depthZeroPoint",
                           "depthFiltered","targetDepth","laserDistance",
                           "laserStrength","laserDistanceFiltered","targetDistance",
                           "tachoCount","trueTachoCount",
                           "syringePos","syringeTargetPos","syringeNeutralPos",
                           "error","integral","derivative","PIDoutput","syringeMotorCtrl",
                           "controlMode","motorsState","buttonsState","radioPower",
                           "pressureSensorTemp","laserTemp","cpuTemp"]]
            logData = logHeader + logData
        for logLine in logData:
            for value in logLine:
                logFile.write(str(value) + ' ')
            logFile.write('\n')
        logFile.flush()
        logData.clear()

    #debug print
    if (perf_counter_ns() - prevPrintTime) / 1e9 >= 1.0:
        secondsSinceLastPrint = (perf_counter_ns() - prevPrintTime) / 1e9
        prevPrintTime = perf_counter_ns()
        loopInterval = secondsSinceLastPrint / loopCount * 1000
        loopCount = 0
        print("mode %.0f, depth %.1f, laser %.1f, tacho %.0f, syPos %.1f, loop %.1f"
              % (controlMode, depthFiltered*100, laserDistanceFiltered*100,
                 tachoCount, syringePos, loopInterval))

    sleep(SLEEP_TIME / 1000)
    loopCount += 1

#stop motors and power down components
motorForward.value = 0
motorBackward.value = 0
motorLeft.value = 0
motorRight.value = 0
motorDive.value = 0
motorSurface.value = 0
radioPower.value = 0
tachoPower.value = 0

writeConfigFile()
print("storedTachoCount=%i, syringePos=%.1f" % (storedTachoCount, syringePos))

print("program ended")

Read through the whole thing. This is so interesting! Your channel is well underrated and this is going to help a ton of people including me 🙂
LikeLiked by 1 person
btw, if you can please upload the full 20 minute run through the river (unlisted, linked in the video desc). It could be very relaxing for some people 🙂
LikeLiked by 1 person
Good idea. The 20 min footage is now linked in the video desc and also embedded in this blog post.
LikeLiked by 1 person
Thanks for providing instructions for building Submarine 4.0,
Do you have a guide for building Submarine 2.0? Because I am looking for a parts list and step by step instructions. I am very interested in building that model since it isn’t as expensive as the current 4.0 model and it still turns out amazing.
Thanks, Josh.
LikeLike
Are you going to bulid 5.0 version or 4.1? That will be easy and recommended to build?
LikeLike
5.0. It should have a major new idea I haven’t explored yet. To make it interesting and entertaining for Youtube. I haven’t thought about it yet.
LikeLiked by 2 people
Nice work ! don´t give up. I made some comments on the FB post in our robotics and RPI PICO group. Now I see the bad hydrodynamics is mentioned in your nice blog as an issue, yes a big one ! You need to improve this for the next project, but not only the nose, also the back should be round because of drag, then you will steer it much better. you are correct you can not steer it with a flat nose, you have built a brake. I loved the PID and the TOF sensors. using RPI for this is overkill, you should probably go for a smaller MPU, either the PICO or an ESP32. Well done ! and congrats again.
LikeLike
Thanks for the shoutouts. Good point about the flat back. The reason why I only mentioned making the front streamlined, is because that should be an easy improvement. The back has magnetic couplings that require a flat area to work. Making the back round would be more difficult.
LikeLiked by 1 person
Hey!
Really, very interesting and intelligent. Thanks for the content! Your integration of scientific theory, investigation/brain storming, problem solving, practicality, computer science, hardware/electronic work, and everything else involved is impressive beyond words.
Something that seems so silly, yet involves such high level/culminated human areas of thought on many fronts. And then the communication and data/progress organization for presentation.
SUPER high level.
May I ask what kind of education/work/personal experiences led you to be able to do something like this, in this way?
LikeLiked by 1 person
Thanks Ryan. Very kind words.
Well, I have the most work experience in coding. That obviously helped a lot here. Also, I’ve done 3 submarines previously and an Inverted Pendulum project where I used PID control.
Basically, you learn by doing, one step at a time. It’s not rocket science (yet :)). Complex things are just a collection of simple things anyone could learn if you spend enough time with it. I think most of you readers could finish a similar submarine project successfully if you spent like 500 hours on it. I had to spend only 300 hours since I had experience.
LikeLiked by 1 person
Maybe try ISM spectrum (sub 1GHz) transceivers , eg. from https://www.hoperf.com/ There are three identically priced models available: RFM96 (433MHz), RFM95 (868MHz), RFM95 (915MHz) and a slightly cheaper RFM98 (433MHz). Works with Arduino library https://github.com/jgromes/RadioLib
Love the captain although at a certain point using Lego is cute but really impractical.
Software wise the next version could try using one of the existing open source drone OS projects instead of a custom system. This will likely be more maintainable and get you free features.
Optional design challenge: survive the dangerous waters of a Finnish spa.
LikeLike
What camera are you using for the project?
LikeLike
Main camera for video: Sony AX43
Underwater shots: GoPro HERO8
Onboard camera in the river: RunCam 5
Most images in this blog: Samsung A41 phone
LikeLike
thank you, can you also tell me how you get the status information about time, temperature, depth, in the video?
I assume the video is not controlled by the raspberry pi ……
LikeLike
Sure. Raspberry Pi writes the status information into a log file. I take the log file and run it through a script that creates a video file with changing labels. Then in Premiere I just layer the info video on top of the onboard video footage.
I can put the script somewhere for download if you want to take a closer look.
LikeLike
Thank you….Yes please upload the script I would be very interested to have a look on how you did that.
/michael
LikeLike
https://www.dropbox.com/sh/u8a45maz3brrwrw/AADbUx9VZEw5UJPny1bJI-Lwa?preview=log_to_label_video.py
It uses matplotlib TextBox as labels and ffmpeg to create the video.
LikeLike
Hi
Thank you very Much for The script, looking forward to test it.
I just recently discovered your channel on YouTube and your Channel has become my favourite 😀
I also Saw your video on inverted pendulum.
In this project you show a lot of graph-plots but how do you make these graph?
I did not see any plotting library in your python Code.
/ michael
LikeLike
Here is the script for graph videos:
https://www.dropbox.com/sh/pem1mbpp82pbgwz/AAAc5Uqdah6dsNdRhJ95bmCBa?preview=log_to_video.py
LikeLike
I just wanted to say I read the entire write-up and I gotta say it was super interesting! I’m amazed by how much time (and money, what, 600ish euros?!?) you invested into this. The fact that you looks up the wavelength absorption of water to troubleshoot, which I never would have thought of, is just awesome problem solving. It’s clear you put in an immense amount of effort, and I can’t wait to see what your mind comes up with next!
LikeLiked by 1 person
Thanks. 600 EUR sounds about right. You can get it down to 400 if you use lead instead of tungsten and replace Lego rechargeable battery box (over 100 eur) with something cheaper.
LikeLiked by 1 person
Pingback: Making a small working submarine with LEGO and Raspberry Pi #PiDay #LEGO @Raspberry_Pi « Adafruit Industries – Makers, hackers, artists, designers and engineers!
Pingback: Making a small working submarine with LEGO and Raspberry Pi - PiShop Blog
Pingback: ICYMI Python on Microcontrollers Newsletter: CircuitPython Day Friday, Python Still #1 and much more! #CircuitPython #ICYMI @micropython @Raspberry_Pi « Adafruit Industries – Makers, hackers, artists, designers and engineers!
Pingback: ICYMI Python on Microcontrollers Newsletter: CircuitPython Day Friday, Python Still #1 and much more! #CircuitPython #ICYMI @micropython @Raspberry_Pi – Best Soundcloud Rappers 2019
Hi
First of all thank you create this great work. we want to make a new one just like you do, we find missing detial circuit diagram. so can you help me to figure out how to connect each component.
LikeLike
Hi. I added a new diagram to the electronics page. Hopefully that will clear out things for you. Zoom in to see the small texts. Here is a link to the image:

I also suggest you check the GPIO assignments from the code. See what pin id is given to each Device and Button object. That way you can be sure the pin does the right thing. Here is a GPIO pinout mapping to see where they are physically located:

LikeLike
Thanks a lot of your youtube and open source information:
My grand sons have very interssting. We would like to make this awersome U-Boot
Have a Helty and best progress
LikeLike
Did you write the code by throwing the operating system into the raspberry or did you throw the codes into an sd card?
LikeLike
I installed an operating system (Raspberry Pi OS) into an SD card. Then I booted the Raspberry Pi with the card and used Thonny (a Python IDE program) to write and execute the code.
More details here: https://brickexperimentchannel.wordpress.com/2022/07/13/rc-submarine-4-0-electronics-8-10/
LikeLike
I tried to Install Routed Wireless Access Point on my raspberrypi zero 2w card but I couldn’t do it completely. I followed the instructions but it didn’t work. Can you help me about it?
LikeLike
If I remember correctly, the steps I took were these:
-install and enable hostapd
-install dnsmasq
-change /etc/dhcpcd.conf to hold nothing but the example content from documentation
-change /etc/dnsmasq.conf to hold nothing but the example content from documentation
-create /etc/hostapd/hostapd.conf with the example content, but different ssid and wpa_passphrase
-reboot
-after reboot I see the ssid on my laptop and can connect to it
Documentation is this:
https://www.raspberrypi.com/documentation/computers/configuration.html#setting-up-a-routed-wireless-access-point
LikeLike
To enhance range you could create a buoy attached by an antenna to the raspberry pi. you sacrifice some speed and maneuvering through cluttered areas but gain range.
LikeLike
How to convert lego cable to jumper cable
LikeLike
Is there maybe a way to build a low frequency controller on your own ?
LikeLike
do you got a parts list for the Submarine 2.0?
LikeLike
You can find key components listed in the Submarine 2.0 video description. But that is all. I don’t have a full part list available.
LikeLike
hi,I’m having some code problems with the pressure sensor, can you help?
The sensor I am currently using: ABPMRRN005PD2A3
How can I use this? I tried a few codes but it didn’t work.
program started
Traceback (most recent call last):
File “/home/pi/Desktop/submarine_4/submarine_4değitü.py”, line 326, in
pressure, pressureSensorTemp = readPressureSensor()
File “/home/pi/Desktop/submarine_4/submarine_4değitü.py”, line 81, in readPressureSensor
bus.write_i2c_block_data(PRESSURE_SENSOR_ADDR, 0xAA, [0x00, 0x00])
TimeoutError: [Errno 110] Connection timed out
I get this error.
LikeLike
Hi. Well… I have never used an APB series sensor. The ones I tested for this project were APB2 and SSC. But, after googling I think the APB series communication protocol is the same as SSC series. So the submarine4.py code should work. Not 100% certain.
Your sensor output type is 2 = I2C with address 0x28. That should work with the code.
Other than that, the only thing is to check everything:
check that I2C is enabled
check the wiring on the sensor (I find it always difficult to correctly orient the layout from the specs)
check the wirings on the Raspberry (or whatever you are using)
measure that the sensor Vsupply pin is getting 3.3V
LikeLike
I will try this, thank you for your quick reply.
LikeLike
Hi, I’m having some problems with my code.
raceback (most recent call last):
File “/usr/lib/python3/dist-packages/serial/serialposix.py”, line 322, in open
self.fd = os.open(self.portstr, os.O_RDWR | os.O_NOCTTY | os.O_NONBLOCK)
FileNotFoundError: [Errno 2] No such file or directory: ‘/dev/serial0’
During handling of the above exception, another exception occurred:
Traceback (most recent call last):
File “/home/pi/bysj.py”, line 107, in
serial = Serial(“/dev/serial0”, 115200, timeout=0.01)
File “/usr/lib/python3/dist-packages/serial/serialutil.py”, line 244, in init
self.open()
File “/usr/lib/python3/dist-packages/serial/serialposix.py”, line 325, in open
raise SerialException(msg.errno, “could not open port {}: {}”.format(self._port, msg))
serial.serialutil.SerialException: [Errno 2] could not open port /dev/serial0: [Errno 2] No such file or directory: ‘/dev/serial0’
could you tell me how to deal it,and what is /dev/serial0.
thanks!
LikeLike
Check these two:
1) You have serial port enabled in raspi-config
2) /boot/config.txt contains enable_uart=1
LikeLike